*This post may contain affiliate links, which means if you use these links to make a purchase, I may receive a small commission at no additional cost to you. You’re not obligated to purchase using these links but when you do, you are supporting my work here on this blog. I use and love all products I recommend.
Baking your own sourdough bread is so tasty and healthy (yes, healthy bread!) and doesn’t have to require being an expert baker. When I starting learning to make sourdough, there were all these strange baking terms no one seemed to ever explain the meaning of, and every book or website seemed to have a different way of doing it. But which one is the best and easiest way?! I just want to bake bread without getting a headache!
So I did a lot of reading and experimenting, taking bits and pieces from each of the different methods as I went. my goal was a process that produced a loaf that looked like it came from a bakery, required very little kneading (so boring!), included lots of whole grain flours for maximum flavor and nutrition (mmm!), needed no special equipment used only for bread baking (because NYC apt!), dirtied as few dishes as possible (lazy!), fed the starter in a way that didn’t call for tossing out copious amounts of it (wasteful!), didn’t require a glossary or any bakery knowledge, was as simple as possible, and didn’t require lots of hands-on time with a schedule such that you could bake even on a workday. Two years of experimentation later, success!
My process only requires about 10 minutes of hands-on time, dirties just one bowl and a couple utensils, and calls for less than 30 seconds of kneading, or “smooshing” the dough around on the counter, if you prefer. Super simple! It requires some explaining, so the process looks long when written out, but you’ll be doing in by memory after a few run throughs. The long rising and the sourdough fermentation process, as opposed to using baker’s yeast, converts the bread to something that is low in gluten and high in absorbable vitamins and minerals. There’s even a study that shows when a slice is eaten with a meal, it lowers the glycemic index of the whole meal. But really who cares; what’s really important is that it tastes amazing!
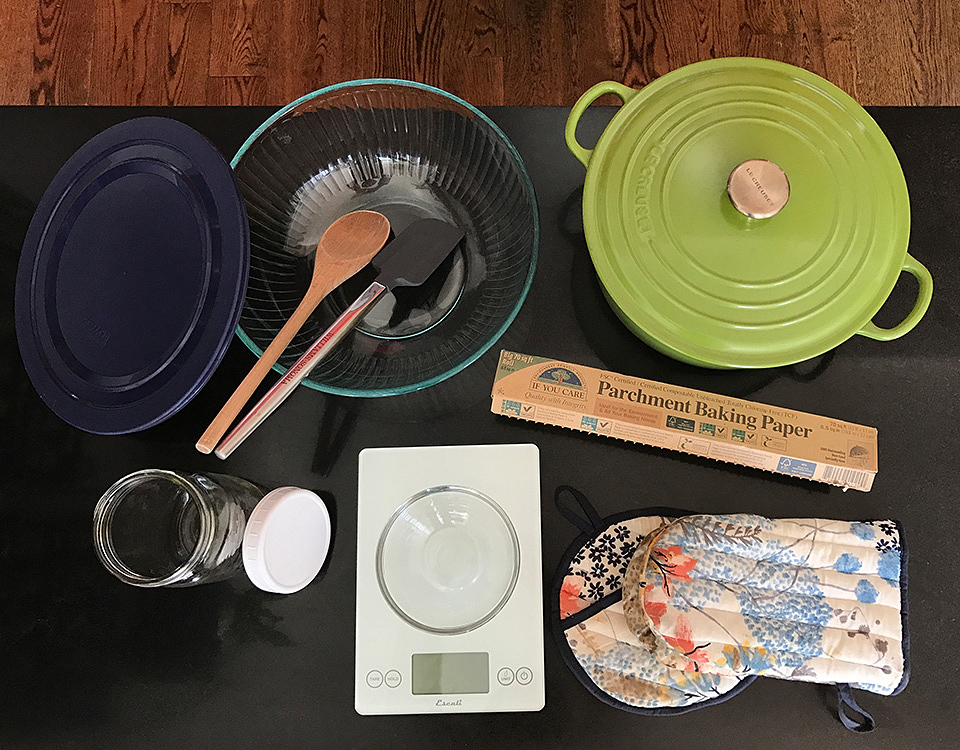
- Quart-size mason jar with a plastic lid to store the starter in the fridge (live cultures and metal don’t go well together, unless it’s stainless steel!)
- Large glass bowl with a lid (or plastic wrap)
- Wooden spoon
- Digital Scale – once you start baking the European way by weight, you won’t want to go back- fewer dirty utensils and consistent measurements! Before, I always wondered why on earth recipes listed grams as well as cups and tablespoons and now I get annoyed when they don’t!
- Spatula
- Small bowl for weighing the salt
- 5-6 quart Dutch oven – the key to a crust that would make any bakery proud. I bought mine for this purpose and now use it for so many things.
- Oven mitts
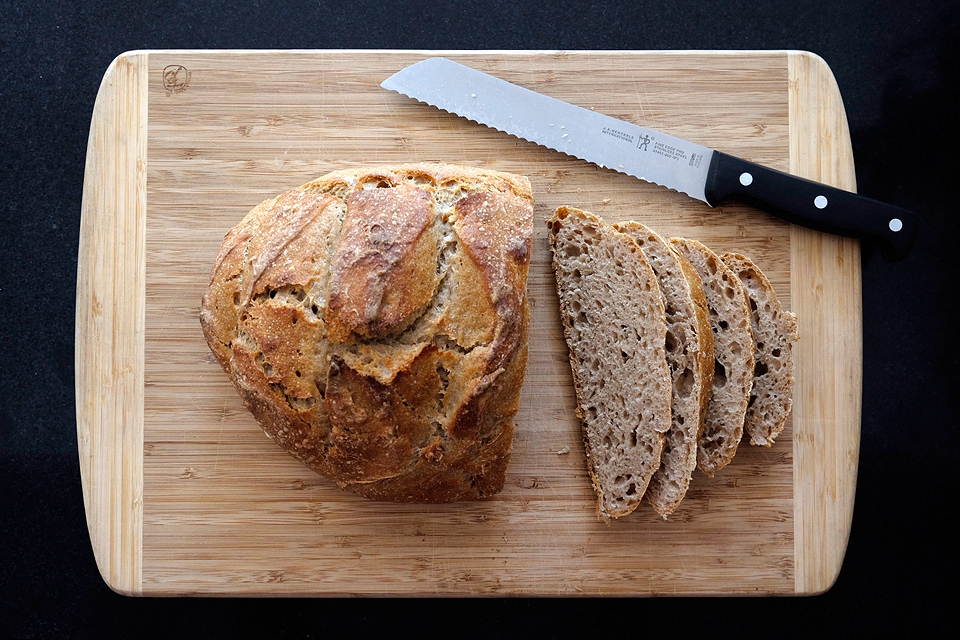
- Bread knife (not pictured as I forgot to include it in the photo!)
- Parchment paper
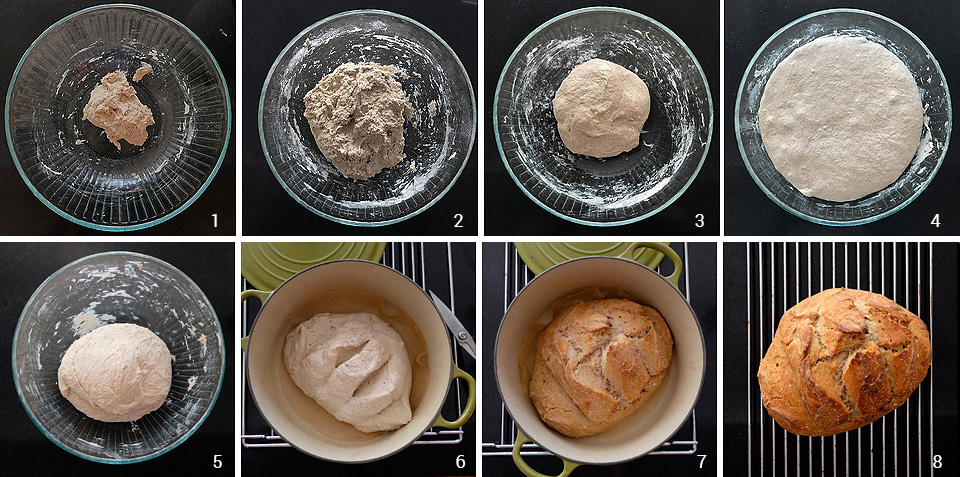
- Saturday morning mix the leaven- step 1.
- Saturday evening mix the dough- steps 2-3.
- Sunday morning shape and bake the loaf- steps 4-8.
- Monday evening mix the leaven- step 1.
- Tuesday morning mix the dough- steps 2-3.
- Tuesday evening shape and bake the loaf- steps 4-8.
For the leaven (fancy word for “let’s get this bread party started!”):
- 6-10 hours before you will make your dough, mix the starter, water and flour in a large glass or stainless steel bowl with a wooden spoon (you’ll be mixing the dough in this bowl in the next step so make sure it’s large). Stir until no dry bits remain, cover the bowl with plastic wrap and let sit on the counter until the next step.
*You can use the starter straight from the fridge, no need to feed first or bring to room temperature. Just make sure to stir it first. Any brown liquid can be stirred in, it’s just alcohol from the fermentation process of the starter cultures. See the note on bottom of this post for more details on obtaining and caring for a starter.
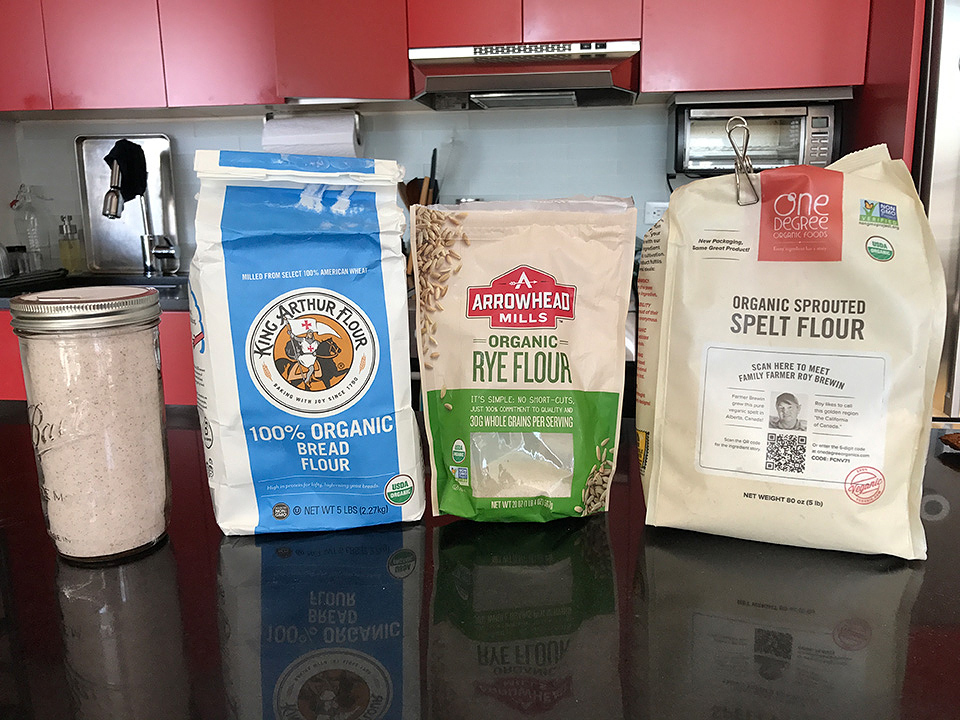
**Chlorine in water kills the culture, so it’s important to use filtered water. Make sure you use a wooden, plastic, or stainless steel spoon to stir the starter and mix the dough. Reactive metal will degrade the starter over time.
For the dough:
- When the leaven is puffy, add the water to the leaven in the same bowl you started with until combined. Mix in the flours with a wooden spoon or your hands until no dry bits remain. Cover with the bowl’s lid or plastic wrap for 30 minutes (this rest time before incorporating the salt is key to the rising of the bread later).
- Sprinkle the salt on a wet counter and knead or “smoosh” the dough around with wet hands for 30 seconds or so until the salt is evenly distributed (I promise the dough won’t stick as long as your counter and hands are wet!). The dough will transform from a shaggy mass to a smooth, silky ball. Return the dough to the bowl and cover as before. Allow to ferment and rise at room temperature for 8-15 hours.
Baking your loaf:
- When the dough is puffy and roughly doubled in size, you are ready to bake your loaf. With a spatula, fold the dough onto itself a few times within the bowl to roughly shape into a ball of dough. Cover and let rest 30-40 minutes while your oven preheats. (Alternatively, if you know how to shape a boule, you can go ahead and do that now, then place it on a square of parchment and cover it with the overturned bowl).
- Place Dutch oven with lid inside a cold oven, and preheat to 475º (or 500º if your oven goes that high. Use the convection fan setting if your oven has it. Make sure the Dutch oven preheats for at least 30-45 minutes before moving on to Step 6.
- Rip off a square of parchment paper. Use a spatula to ease the dough ball out of the bowl onto the parchment in one piece (or if you shaped into a boule, obvs skip that since your dough is already on the parchment, hehe). Use a bread knife to score the loaf with 4-5 slits- the weight of the knife alone should get them the right depth without you having to push down (about 1/2″ deep, not quite as deep as in my photo, I made them too deep there). This will allow the bread to release steam and rise evenly.
- Take out the hot Dutch oven and carefully lower the parchment with dough inside (be careful, it’s SUPER hot. Use really thick oven mitts). Replace the cover and place the whole thing back in the oven.
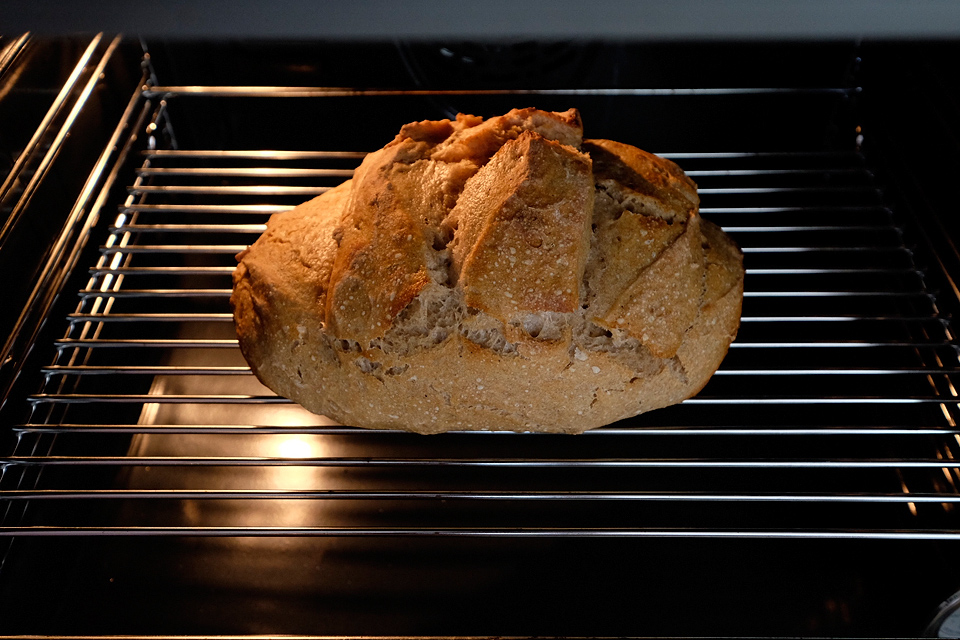
- Bake for 25 minutes, then remove the loaf from the Dutch oven and place the loaf directly on the oven rack. Lower the temperature to 425º and leave the oven door open for a bit until the temperature comes down. Bake for an additional 5-15 minutes or until dark golden brown and the loaf sounds hollow when you knock on the bottom. You’ll want to bake it longer than you feel like you should, it can handle getting pretty dark brown without tasting burnt as the fermentation process created sugars that will caramelize rather than burning starches.
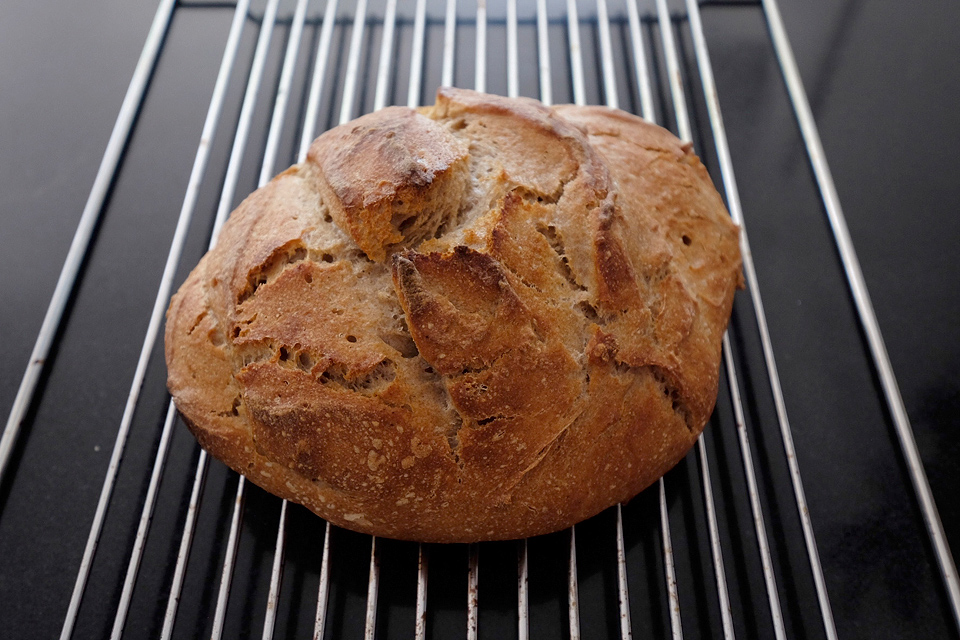
- Allow to cool fully on a rack before diving in. Jake and I have been known to polish off half a loaf, simply dipping it in olive oil with salt and pepper and calling that dinner! The loaf is best the first day or two, but will be good as toast for about a week. My favorite way to store bread is cut-side down in these washable paper bags – they allow just enough moisture through the material to keep the crust from getting soggy but not so much that the bread will dry out. Simply amazing! The alternative is to wrap the loaf in a dishtowel and place inside a ziptop bag (but don’t seal the bag, leave it open). The acidity of the bread will keep it from molding at room temperature; it shouldn’t be stored in the fridge. If necessary, you may pre-slice it and freeze for later.
Notes:
- Obtaining a starter:
- If you have a friend that has a starter, I’m sure they would be happy to share! I am!
- Bakeries that use starters are often willing to give you some if you bring your own jar (that’s how I got one of mine!).
- You can buy one: they come dried and then need to be reactivated HERE or HERE, or you can buy one that’s hydrated and ready to be used HERE.
- If you are feeling adventurous and want to “catch” your own, follow the directions HERE.
- Caring for your starter: A quick search online will yield any number of ways of caring for a starter, most of which involves copious amounts of flour and the discarding of a lot of starter in the process of feeding it. I’m all about simplicity so I came up with a way to keep my starter in the fridge most of the time and making use of the leaven step above, both of which reduce the waste of flour and starter. Once you have an active starter, follow these feeding directions:
- In a clean mason jar, weigh out 75 g starter. Discard whatever you have left. Add equal amounts of flour and non-chlorinated water by weight- about 150 grams of each. Stir until no dry flour remains. Let sit on the counter until bubbly and starting to rise (a few hours or so, depending on how warm the room is), then refrigerate.
- Use this starter directly from the fridge to make the leaven for your dough, as directed above. If you bake often, your starter will get low – once it gets to about the 1/2 cup line on the jar (about 3/4 inches), it’s time to feed again as in the previous step. If after about two weeks, you still have lots left, you’ll want to feed it by discarding all but 75 grams and following the directions as in the previous step.
- Baking in a bread pan: Line a bread pan that will fit inside your Dutch oven with parchment paper so it will come out with ease. Within the mixing bowl, shape the dough into an oblong shape that will fit in your bread pan and proceed with the rest of the steps as normal. After removing the Dutch oven lid, you’ll pull the loaf out, remove the parchment and place the loaf directly on the oven rack to brown up.
- On rising the dough: After the 8-15 hours of rising, you can put the dough in the fridge for up to a week if you don’t have time to bake it just then (this will also make the dough more sour tasting). You don’t even have to wait for the dough to come to room temperature before baking, just shape it as usual and proceed. In fact, I use this trick if the dough is too soft and difficult to work with because it over fermented and it’s not holding its shape. Placing it in the fridge and then subsequently using it cold straight out the fridge firms up the dough so it’ll keep its shape and not just flatten all over the place. The warmer the room temperature the faster it will rise, so especially in the summer, you’ll want to go with the shorter amount of time. Also, the less time you let the dough rise, the more it will puff up in the oven for the finished loaf. You can shorten the rise time to 4 hours but the flavor of the loaf won’t be as complex. The more time the dough rises, the more sour it will be, but it will puff up less while baking. You can go as long as 24 hours but at 18-24 hours or so, you’ll get a fairly dense, flat and extra sour loaf.
- Final note: Even if things don’t go as you’ve planned, bake the loaf anyways and see what happens- I have yet to bake an inedible loaf. Some were extremely dense, flat or not so pretty, but all tasted good! I just call them rustic and happily munch away. I’ve also never had two loafs that were exactly the same. So many variables (room temperature when making the leaven, room temperature when raising the loaf, length of rise, how recently the starter was fed, how sour the starter is, etc etc) affect the process that it makes for a different loaf each time. That’s the beauty and the fun of it! I’ve tried to write a recipe that’s foolproof, but there’s not such thing. Because of all those variables that affect how a loaf turns out, part of your journey is learning how the dough reacts throughout the process and figuring out what works best for you in your kitchen. My favorite moment is taking the lid off the Dutch oven and seeing the partially baked loaf for the first time. Magical! So have fun and enjoy the best bread you never knew could come out of your own oven!
Comment
Holy awesomeness. I might have to go buy a digital scale and find myself a starter. :)